Although it was April 16th I want to share my decor ideas and his special day!
My decor ideas came from many blogs but I just made them into my own.
So I made his name with cardboard letters from joann fabrics also using fabric and paint that matched my color scheme. I hadn't planned on using the squeries sticking out of the side of the "J" and the taped twine on the walls, but that morning didn't exactly go the way I wanted to I had to make do with what I had around the house. So I got the idea to do this from graysparrow.com but I changes it up a little, I really wanted to use the branch in the example but I couldn't find anything similar that was like that to be accessible to me.
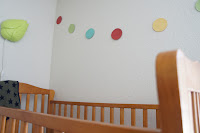
 So the circle garland at first had no place at all but I just knew I wanted to use it so I found two places to hang them in my little space to decorate. This garland looks easy to make but it was a very tedious and lengthy project, I would of documented it had it not been 2am and if I wasn't half asleep. With that said I got this idea from an etsy page I came across, I was going to order them but they didn't have my colors and I figured I could make them for the price it would cost me to buy them plus the tax and shipping. And I did I got the string for free, funny little story behind that. "We were at our neighborhood store the night before Jay's birthday and he wet his diaper so I ran out to the car to change him because I didn't bring it in the store and Jaylen was holding the string and I didn't notice until we were pulling out." Anyway so the paper was 65cent and half off and I used 4 colors you do the math. Those turned out great and I even recycled them and used them in his play room and bedroom.
(not the best picture sorry)
 |
| Every needs birthday hats, so instead of buying those small ugly and slightly shiny typical birthday hats I made them. I don't know if you can tell but they are slightly bigger than the standard birthday hat. I also wanted them to be plain but stick out a little so they wouldn't out shin Jaylen's special birthday hat so thats why I took the time to cordinate the color of the hat with the ribbon. This idea to make these hats came from pinterest then yet another link, I was going to embellish them like the example I found but I thought they looked fine the way they were.
The main center piece that just made Jaylen stand out at his little party, tissue paper pom poms! These were fun to make because anticipating how they would look after you opened them was the exciting part. And when I stepped back to really look at them they looked so good. I saw this idea on tumblr on one of my favorable mom blogs. But she ordered her's and I was going to but again they didn't have the colors I was going for so I found out how to make them myself. I also made them for a lot cheaper rather than buying them. I got the tissue paper at party city for a dollar for 4 colors and the ribbon for $2.67 and I got 3 colors of that orange, yellow and green.
The banner, you just have to have the "happy birthday" banner. So I made this myself with a little inspiration of course but making it was simple I just used some stock paper from joann's and found a font I like on the computer and then simply printed it out, traced the letters and cut them out. I was originally going to buy this banner too but like the rest of the decor I decided to make it. Although the link to the paper says the paper was 9 dollars no way I spent that much om some paper. I got them in store for 65 cent each. So in the end I saved a bunch. When it came to putting these together it wasn't as tedious as the circle garland surprisingly. All I did was poke a small hole in each side of each letter and put the string through and tied it |


what a spectacular set up. I love all the bright colors you used. Very cute indeed.
ReplyDeleteThis is way too cute.
ReplyDeleteXo adropofbliss.blogspot.com
Thanks guys! :)
ReplyDelete